How to Organize a Small Closet Like a Pro
A small closet has a way of becoming a catch-all space almost overnight. Coats pile on top of shoes, shelves fill with forgotten items, and before long the whole space feels like it’s working against you instead of for you. The good news is that even a modest reach-in closet — the kind that measures just a few feet wide — can be transformed into a genuinely functional storage zone with the right sequence of steps and a realistic budget. This guide walks you through that entire sequence, from the first brutal declutter pass to the five-minute weekly habit that keeps everything in place.
The Declutter Pass: The Last 12 Months Rule
Before you measure a single wall or buy a single bin, you have to deal with what’s actually in the closet. The most reliable framework for this is the 12-month rule: if you haven’t used or worn an item in the past year, it leaves. No exceptions for “what if,” no leniency for “when I lose the weight.” Twelve months is generous — it covers every season, every occasion type, every climate shift. If something didn’t earn its place in that entire window, it’s not earning it going forward either.
Pull everything out and sort into three piles: keep, donate/sell, and trash. Be honest about condition. Items that are worn, broken, or stained don’t deserve shelf space. Once your “keep” pile is established, group like items together — all shirts together, all shoes, all accessories. This grouping will directly inform how you configure the closet, because you’re essentially building storage around what you actually own, not around what a generic closet is assumed to hold.
Measuring Your Space
Once the closet is empty, get a tape measure and write down every dimension: width, height from floor to ceiling, and depth from front wall to back wall. Standard reach-in closets are typically 24 inches deep and anywhere from 36 to 72 inches wide, but yours may vary. Note the location of any existing rods, shelves, or brackets, and mark where the light fixture or outlet is if there is one.
The measurements that matter most for planning are:
– Rod height (existing or planned)
– Distance from rod to floor (determines what fits below)
– Usable vertical height (floor to ceiling, minus any fixed shelf)
Sketch a rough diagram on paper. You don’t need software — a pencil sketch with labeled dimensions is enough to bring to any hardware store or to use when shopping online. These numbers will determine whether double-hanging is feasible, how many shelving units fit, and what size bins to buy.
Double-Hang Rod Placement
The single most effective way to expand hanging capacity in a small closet is to install a second rod below the first. This works for any clothing that hangs shorter than about 40 inches — shirts, jackets, folded trousers, and blazers. The standard placement is a top rod at roughly 80 to 82 inches from the floor and a lower rod at 40 to 42 inches, which leaves enough clearance between them for most tops and gives you floor space below the bottom rod for shoes or a small drawer unit.
If your ceiling is lower than 8 feet, adjust accordingly — the key ratio is that you want at least 38 to 40 inches of clearance between the two rods. Closet rod kits sold at most hardware stores include brackets and hardware. If drilling isn’t an option (renters, take note), a tension-mounted double-hang rod can drop into the existing rod without tools and holds a surprising amount of weight — usually 30 to 50 pounds depending on the model.
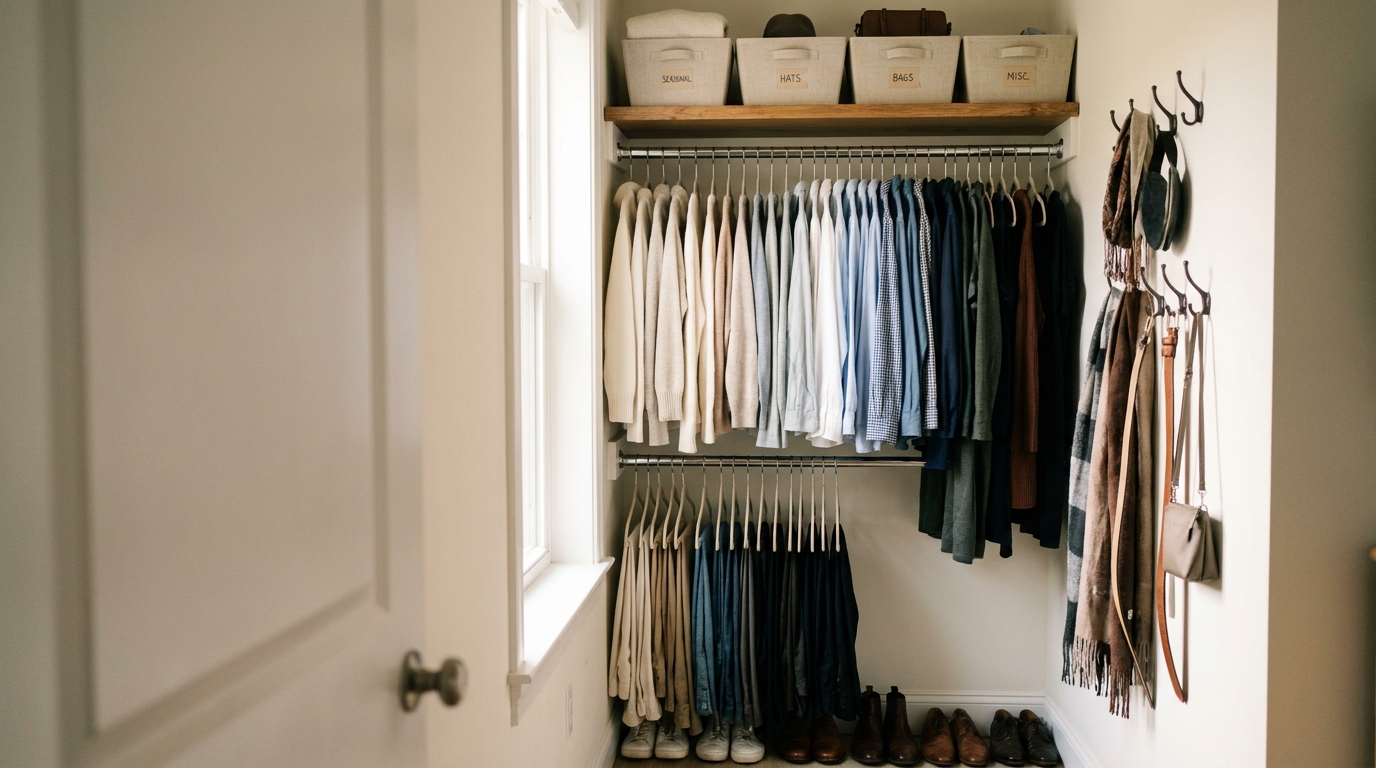
Shelf Dividers
Shelves without dividers devolve into leaning towers of sweaters and tumbling stacks of jeans. Shelf dividers — simple L-shaped or clip-on panels that attach to the shelf surface — create distinct vertical columns and keep folded stacks from migrating into each other. They’re especially useful for:
- Sweaters and knitwear, which are too stretchy to hang and need support
- Handbags, to keep them upright and separated
- Folded jeans and denim, which tend to be heavy and collapse stacks quickly
Most clip-on shelf dividers require no tools and fit shelves between ¾ inch and 1 inch thick. A set of four to six dividers is usually enough for one standard shelf unit. Place them at intervals that match the natural size of your folded stacks rather than at equal spacing — functional beats symmetrical every time.
Labeled Bins
Bins serve two purposes: they contain smaller loose items that would otherwise scatter, and they create visual order that makes restocking intuitive. The label is what makes the difference between a bin that gets used correctly and one that becomes a dumping ground. Use clear or consistent labeling — whether handwritten tags, printed labels, or a label maker — and be specific. “Scarves” beats “accessories.” “Winter hats” beats “misc.”
Choose bins sized to your shelf depth. For a 24-inch-deep shelf, a 14 to 16-inch-deep bin fits without overhanging. Fabric bins with structure (not floppy canvas) are easiest to pull out and push back in. Clear-sided or open-top bins work well for items you access frequently; lidded bins are better for seasonal or rarely needed items stored on higher shelves.
Vertical Shoe Storage
Shoes are among the most space-inefficient items in a small closet when they’re stored flat in pairs. Shifting to vertical storage — either angled shoe racks, over-door shoe pockets, or slanted shelf inserts — can easily double the number of pairs you fit in the same footprint. A standard angled shoe rack stores pairs at a 45-degree angle, allowing the toe of one pair to tuck under the heel of the next.
For a small closet, a two- or three-tier angled rack placed on the floor below the lower hanging rod is the most efficient option. If floor space is at a true premium, an over-door shoe organizer (the clear-pocket style) handles flats, sandals, and sneakers well, though it’s less suited to heavier boots. Boots stand best upright on the floor with boot shapers or rolled magazines inside them to hold their shape.
Accessory Hooks and Over-Door Solutions
Vertical wall space and the back of the door are often entirely wasted in small closets. Adhesive or screw-mounted hooks on the side walls can hold belts, bags, scarves, and robes. A multi-hook strip — the kind with five to eight swiveling hooks on a horizontal bar — holds more than individual hooks and keeps accessories visible and reachable.
The back of the door is arguably the most valuable real estate in a small closet. Over-door organizers range from simple hooks to full multi-pocket panels to mirror-backed storage units. Options include:
– Over-door hook bars for bags and robes
– Pocket organizers for accessories, small folded items, or shoes
– Over-door mirror with storage for jewelry and accessories combined
Look for over-door solutions that specify the door thickness and clearance they accommodate, especially if your door trim is substantial or the door opens into a tight space.
Seasonal Rotation
Not everything you own needs to be accessible year-round. A seasonal rotation system keeps your active closet reserved for current-season items and moves off-season pieces to secondary storage — under the bed, in a hall closet, or on a high shelf in labeled bins. The twice-yearly swap (spring/summer and fall/winter) takes about an hour and dramatically reduces closet crowding during peak months.
Use vacuum storage bags for bulky off-season items like down coats and wool sweaters — they compress dramatically and protect against moisture and pests. Label everything clearly with both the contents and the season so the swap-back is fast and thoughtless.
Weekly Maintenance
Organization systems fail not because they’re poorly designed but because no one maintains them. A five-minute weekly reset — same day, same time each week — prevents the small drift that becomes a big mess. During the reset: return anything that’s landed outside its designated zone, fix any collapsed stacks, and pull out anything that doesn’t belong. That’s it. Five minutes. If the reset starts taking longer than that, it’s a signal that either the system needs adjusting or the declutter pass needs revisiting.
Product Lists by Budget
$50 Budget — Target & Walmart
- Mainstays Adjustable Closet Organizer Rod (~$10–$15, Walmart): tension-mounted, no tools needed
- Brightroom Shelf Dividers, set of 4 (~$8, Target)
- Brightroom Fabric Storage Bins, set of 3 (~$12–$15, Target)
- Mainstays 3-Tier Angled Shoe Rack (~$12, Walmart)
- Command Large Utility Hooks, 4-pack (~$8–$10, Target or Walmart)
Estimated total: ~$50–$60
$150 Budget — The Container Store & IKEA
- IKEA BOAXEL Wall Upright + Rod Kit (~$30–$50 depending on configuration, IKEA)
- The Container Store Linus Shelf Dividers, set of 4 (~$20)
- The Container Store Canvas Handled Bins, set of 3 (~$25–$30)
- Honey-Can-Do Over-Door Shoe Organizer (~$20, widely available)
- IKEA SKÅDIS Pegboard with hooks (~$20–$30)
Estimated total: ~$130–$160
$400 Budget — California Closets / The Container Store Custom
- elfa Décor Freestanding Reach-In Solution (~$200–$350, The Container Store): modular, customizable wall system with double hang, shelving, and drawers
- The Container Store Linen Labeled Bins, set of 6 (~$40–$50)
- Over-Door Mirror with Jewelry Storage (~$50–$80, The Container Store or Amazon)
- Premium Cedar Shoe Rack, 4-tier (~$35–$50)
Estimated total: ~$350–$430
A small closet will never become something it isn’t — but it can absolutely become a space that holds everything you need, keeps it visible, and takes almost no effort to maintain once the system is in place. Start with the declutter, trust the measurements, and build from there.
Sources & Price References
– Target Brightroom Collection: target.com/c/brightroom
– Walmart Mainstays Closet Products: walmart.com
– IKEA BOAXEL System: ikea.com/us/en/cat/boaxel-system
– The Container Store elfa System: containerstore.com/elfa
– The Container Store Shelf Dividers: containerstore.com
– Prices verified as of mid-2025; may vary by location and availability.